


A workload is an application running on Kubernetes. Whether your workload is a single component or several that work together, on Kubernetes you run it inside a set of pods. In Kubernetes, a Pod represents a set of running containers on your cluster.
Kubernetes pods have a defined lifecycle. For example, once a pod is running in your cluster then a critical fault on the node where that pod is running means that all the pods on that node fail. Kubernetes treats that level of failure as final: you would need to create a new Pod to recover, even if the node later becomes healthy.
However, to make life considerably easier, you don't need to manage each Pod directly. Instead, you can use workload resources that manage a set of pods on your behalf. These resources configure controllers that make sure the right number of the right kind of pod are running, to match the state you specified.
Kubernetes provides several built-in workload resources, we will see one by one.
1.Deployments
A Deployment provides declarative updates for Pods and ReplicaSets.
You describe a desired state in a Deployment, and the Deployment Controller changes the actual state to the desired state at a controlled rate. You can define Deployments to create new ReplicaSets, or to remove existing Deployments and adopt all their resources with new Deployments.
apiVersion: apps/v1
kind: Deployment
metadata:
  name: nginx-deployment
  labels:
    app: nginx
spec:
  replicas: 3
  selector:
    matchLabels:
      app: nginx
  template:
    metadata:
      labels:
        app: nginx
    spec:
      containers:
      - name: nginx
        image: nginx:1.14.2
        ports:
        - containerPort: 80
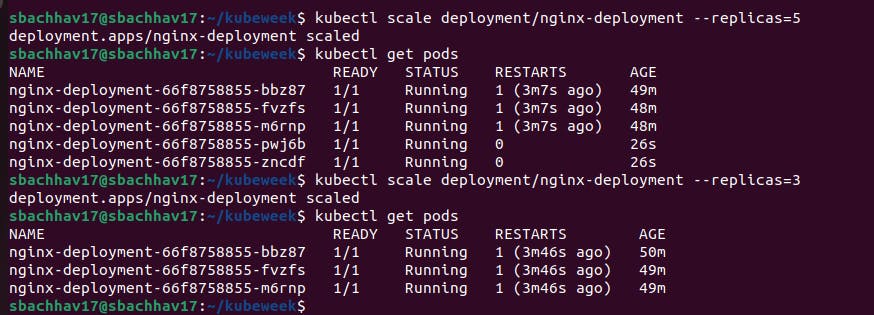
spec.replicas—specifies how many pods to run
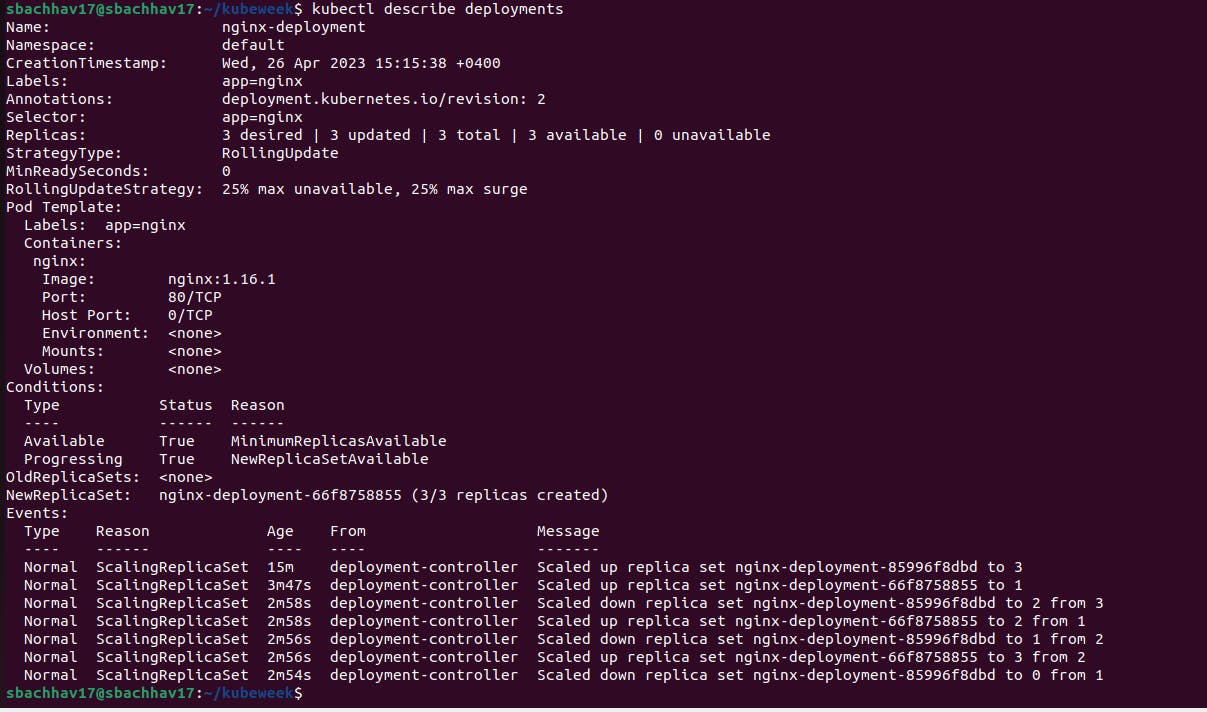
strategy.type—specifies which deployment strategy should be used. In this case and in the following examples we select RollingUpdate, which means new versions are rolled out gradually to pods to avoid downtime.
spec.template.spec.containers—specifies which container image to run in each of the pods and ports to expose.
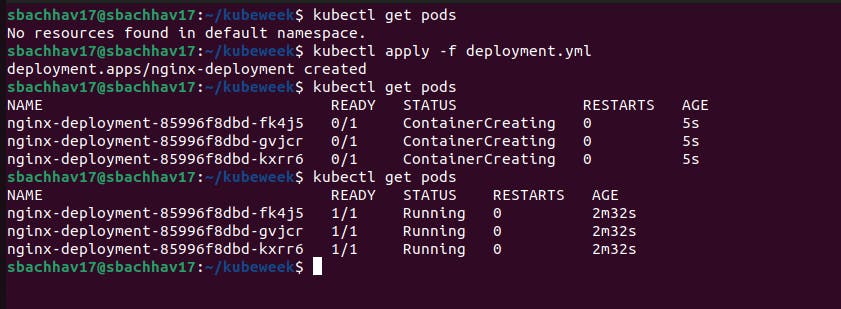
The created ReplicaSet ensures that there are three nginx Pods.

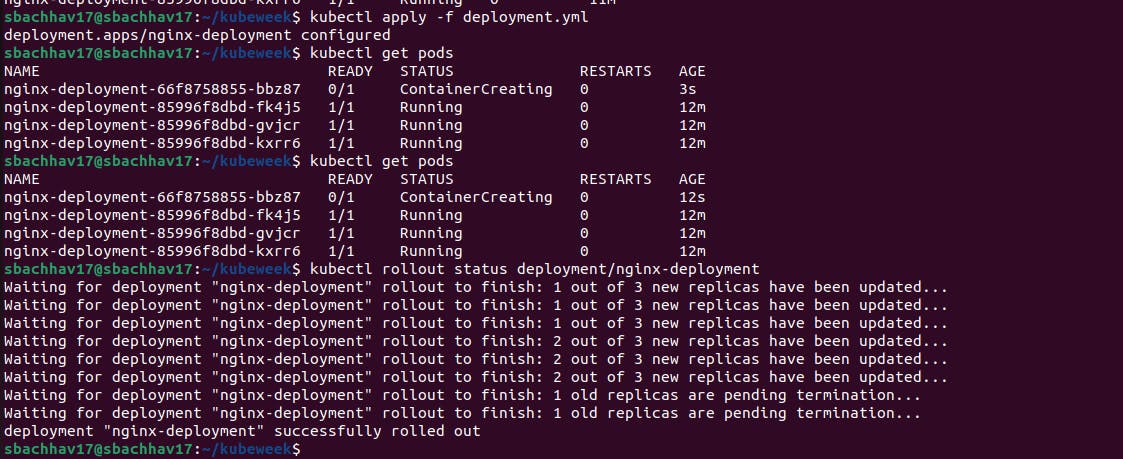
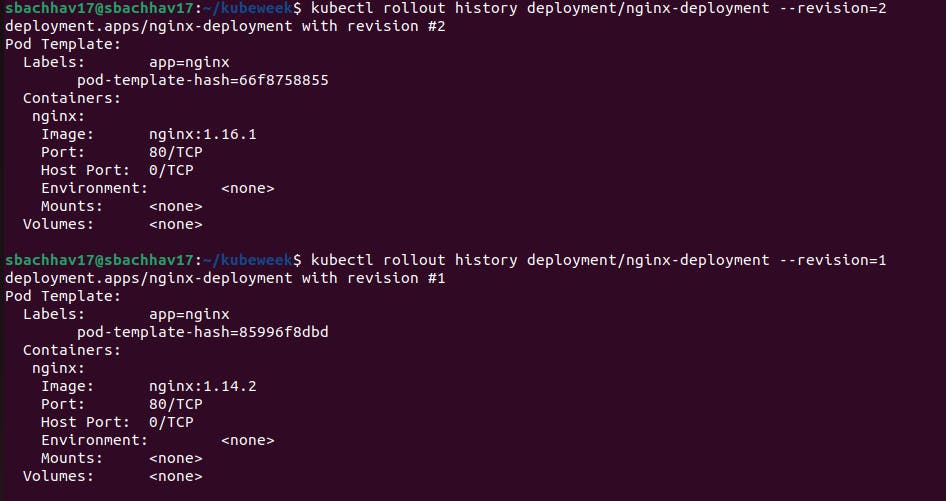
Let's update the nginx Pods to use the nginx:1.16.1 image instead of the nginx:1.14.2 image.
2.StatefulSets
StatefulSet is the workload API object used to manage stateful applications.
Manages the deployment and scaling of a set of Pods, and provides guarantees about the ordering and uniqueness of these Pods. Like a Deployment, a StatefulSet manages Pods that is based on an identical container spec. Unlike a Deployment, a StatefulSet maintains a sticky identity for each of its Pods. These pods are created from the same spec, but are not interchangeable: each has a persistent identifier that it maintains across any rescheduling.
If you want to use storage volumes to provide persistence for your workload, you can use a StatefulSet as part of the solution. Although individual Pods in a StatefulSet are susceptible to failure, the persistent Pod identifiers make it easier to match existing volumes to the new Pods that replace any that have failed.
Using StatefulSets
StatefulSets are valuable for applications that require one or more of the following.
Stable, unique network identifiers.
Stable, persistent storage.
Ordered, graceful deployment and scaling.
Ordered, automated rolling updates.
Creating a StatefulSet
Begin by creating a StatefulSet using the example below.
apiVersion: apps/v1
kind: StatefulSet
metadata:
  name: mysql-statefulset
spec:
  replicas: 1
  selector:
    matchLabels:
      app: mysql
  serviceName: mysql-service
  template:
    metadata:
      labels:
        app: mysql
    spec:
      containers:
      - name: mysql
        image: mysql:5.7
        env:
        - name: MYSQL_ROOT_PASSWORD
          value: mysecretpassword
        volumeMounts:
        - name: mysql-data
          mountPath: /var/lib/mysql
  volumeClaimTemplates:
  - metadata:
      name: mysql-data
    spec:
      accessModes: ["ReadWriteOnce"]
      resources:
        requests:
          storage: 1Gi
The above YAML file creates a StatefulSet named mysql-statefulset with a single replica. It also specifies a selector that matches the label app: mysql. The serviceName field is set to mysql-service, which will be used to create a headless service for the StatefulSet.
The template section defines the Pod template used to create new Pods when scaling the StatefulSet. In this case, it creates a single container based on the mysql:5.7 image, and sets the environment variable MYSQL_ROOT_PASSWORD to mysecretpassword. The container also mounts a persistent volume named mysql-data to the path /var/lib/mysql, which will be used to store the database files.
The volumeClaimTemplates section defines a PersistentVolumeClaim (PVC) template that will be used to create a PVC for each Pod created by the StatefulSet. In this case, it creates a PVC named mysql-data with a request for 1GB of storage with access mode ReadWriteOnce.
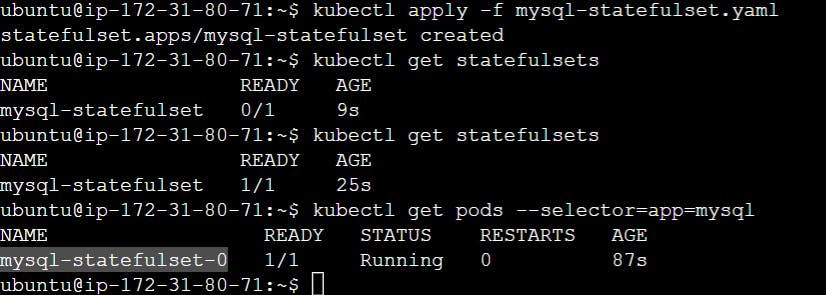
Now let's deploy this StatefulSet on a Kubernetes cluster. Run the following command to create the StatefulSet:
kubectl apply -f mysql-statefulset.yaml
kubectl get statefulsets
This will output the following:
For a StatefulSet with N replicas, each Pod in the StatefulSet will be assigned an integer ordinal, that is unique over the Set. By default, pods will be assigned ordinals from 0 up through N-1.
We can see here, pods are created one by one and with fixed naming patterns like mysql-statefulset-0. No random name for pods of Statefulsets type like deployments workload. The Pod names have suffixes -0, -1, and -2, which indicates the order in which they were created.
These pods are created from the same spec, but are not interchangeable: each has a persistent identifier that it maintains across any rescheduling.
3.DaemonSet
DaemonSet is a Kubernetes feature that lets you run a Kubernetes pod on all cluster nodes that meet certain criteria. Every time a new node is added to a cluster, the pod is added to it, and when a node is removed from the cluster, the pod is removed. When a DaemonSet is deleted, Kubernetes removes all the pods created by it.
In a Kubernetes architecture, DaemonSets are used for deploying background services across clusters, providing support services for every node—such as system operations services, collecting logs, monitoring frameworks like Prometheus, and storage volumes.
Creating a DaemonSet
Let's create an example DaemonSet for a simple log collector that collects logs from all the nodes in the cluster.
Create a file named log-collector-daemonset.yaml with the following content:
apiVersion: apps/v1
kind: DaemonSet
metadata:
  name: log-collector-daemonset
spec:
  selector:
    matchLabels:
      app: log-collector
  template:
    metadata:
      labels:
        app: log-collector
    spec:
      containers:
      - name: log-collector
        image: fluentd
        volumeMounts:
        - name: varlog
          mountPath: /var/log
        - name: varlibdockercontainers
          mountPath: /var/lib/docker/containers
          readOnly: true
      volumes:
      - name: varlog
        hostPath:
          path: /var/log
      - name: varlibdockercontainers
        hostPath:
          path: /var/lib/docker/containers
Now let's deploy this DaemonSet on a Kubernetes cluster. Run the following command to create the DaemonSet:
kubectl apply -f log-collector-daemonset.yaml
kubectl get daemonsets
kubectl get pods --selector=app=log-collector
This will output a list of Pods running on each node in the cluster that matches the label.

Kubernetes DaemonSet is a great way to manage and deploy applications in a clustered environment. It’s easy to use and has a wide range of features, making it an ideal choice for managing applications in a production environment.
You can use DaemonSet to run a cluster storage, log collection, and node monitoring demon on each node.
4.Jobs
A Job creates one or more Pods and will continue to retry execution of the Pods until a specified number of them successfully terminate. As pods successfully complete, the Job tracks the successful completions. When a specified number of successful completions is reached, the task (ie, Job) is complete. Deleting a Job will clean up the Pods it created. Suspending a Job will delete its active Pods until the Job is resumed again.
A simple case is to create one Job object in order to reliably run one Pod to completion. The Job object will start a new Pod if the first Pod fails or is deleted (for example due to a node hardware failure or a node reboot).
You can also use a Job to run multiple Pods in parallel.
Running an example Job
Here is an example Job config. It computes π to 2000 places and prints it out. It takes around 10s to complete.
apiVersion: batch/v1
kind: Job
metadata:
  name: pi
spec:
  template:
    spec:
      containers:
      - name: pi
        image: perl:5.34.0
        command: ["perl",  "-Mbignum=bpi", "-wle", "print bpi(2000)"]
      restartPolicy: Never
  backoffLimit: 4


5.CronJob
A CronJob creates Jobs on a repeating schedule.
CronJob is meant for performing regular scheduled actions such as backups, report generation, and so on. One CronJob object is like one line of a crontab (cron table) file on a Unix system. It runs a job periodically on a given schedule, written in Cron format.
Example of CronJobs
This example CronJob manifest prints the current time and a hello message every minute:
apiVersion: batch/v1
kind: CronJob
metadata:
  name: hello
spec:
  schedule: "* * * * *"
  jobTemplate:
    spec:
      template:
        spec:
          containers:
          - name: hello
            image: busybox:1.28
            imagePullPolicy: IfNotPresent
            command:
            - /bin/sh
            - -c
            - date; echo Hello from the Kubernetes cluster
          restartPolicy: OnFailure
Schedule syntax
The .spec.schedule field is required. The value of that field follows the Cron syntax:
# ┌───────────── minute (0 - 59)
# │ ┌───────────── hour (0 - 23)
# │ │ ┌───────────── day of the month (1 - 31)
# │ │ │ ┌───────────── month (1 - 12)
# │ │ │ │ ┌───────────── day of the week (0 - 6) (Sunday to Saturday;
# │ │ │ │ │                                   7 is also Sunday on some systems)
# │ │ │ │ │                                   OR sun, mon, tue, wed, thu, fri, sat
# │ │ │ │ │
# * * * * *
Now let's run this CronJob on a Kubernetes cluster. Run the following command to create the CronJob:
kubectl apply -f cronjob.yaml
kubectl get cronjobs
This will output the following:

Your cron job should run every minute of every hour of every day of every month, each day of the week.
Conclusion
I hope that you have gained valuable knowledge in the area of Kubernetes Workloads today. Keep Learning.
#Kubernetes #Devops #Trainwithshubham #Kubeweek #day3 #kubeweekchallenge #ContainerOrchestration #TechBlog #CloudNative