Kubernetes Services and Service Discovery

Kubernetes Services and Service Discovery are essential concepts in container orchestration that help manage communication between different parts of a distributed application.
In Kubernetes, a Service is an abstraction layer that sits between the application's internal logic and the outside world, providing a stable IP address and DNS name for a set of Pods. It enables communication between various components of the application running on different Pods, abstracting the underlying IP addresses and ports.
Exposing Kubernetes Workloads to the Outside World Using Services
Kubernetes Services provide a way to expose your application or service to the outside world, whether it's an external client, another service in the cluster, or a load balancer.
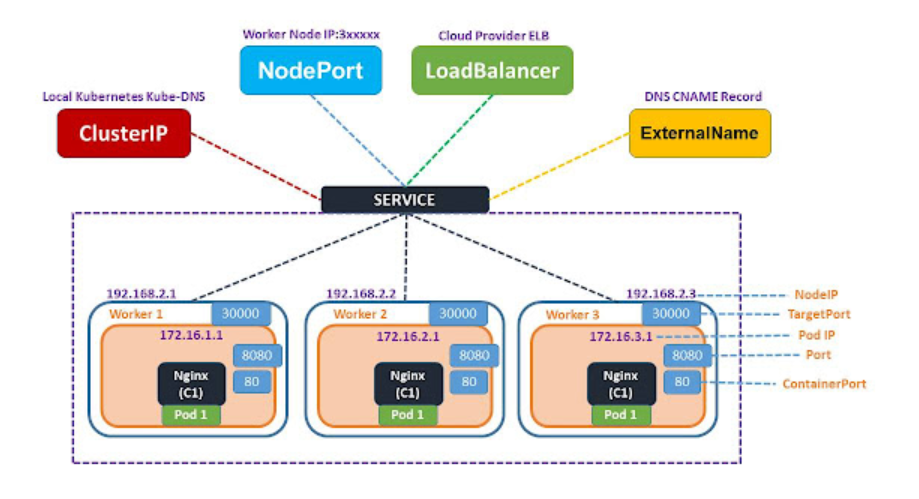
There are several types of services available in Kubernetes, including:
ClusterIP: This is the default Service type. It exposes the Service on a cluster-internal IP address. The Service is only accessible from within the cluster.
NodePort: This type of Service exposes the Service on a port on each node in the cluster. This allows external access to the Service using the node's IP address and the exposed port.
LoadBalancer: This type of Service exposes the Service using a cloud provider's load balancer. This allows external access to the Service through a single IP address and port.
ExternalName: This type maps the service to an external DNS name.
Discovering Services and Pods Within a Kubernetes Cluster Using DNS and Other Mechanisms
Service discovery is a fundamental aspect of Kubernetes architecture that ensures that any service can locate and communicate with other services regardless of their IP addresses or locations. Kubernetes offers various mechanisms for Service Discovery, including DNS-based service discovery and environment variable-based service discovery.
DNS-based service discovery uses Kubernetes DNS service to resolve service names to IP addresses within the cluster. The DNS service ensures that each Service in the Kubernetes cluster is assigned a unique DNS name, allowing for easy communication between Services. We are to see this in practice below.
On the other hand, environment variable-based service discovery allows Pods to access services using environment variables that contain service endpoints' IP addresses and port numbers. This method is suitable for applications that require configuration flexibility or do not rely on DNS-based service discovery. I have not covered this part in this article.
Real-time Scenario:
Let us suppose you have a Web application running in your Kubernetes Cluster. You might have a public-facing load balancer so that your application is accessible to the entire world.
Imagine you have a domain name called example.com and you want to map that to your public-facing load balancer provisioned by Kubernetes.
Here comes ExternalDNS to the picture. ExternalDNS allows you to control DNS records dynamically via Kubernetes resources in a DNS provider-agnostic way. ExternalDNS synchronizes exposed Kubernetes Services and Ingresses with DNS providers.
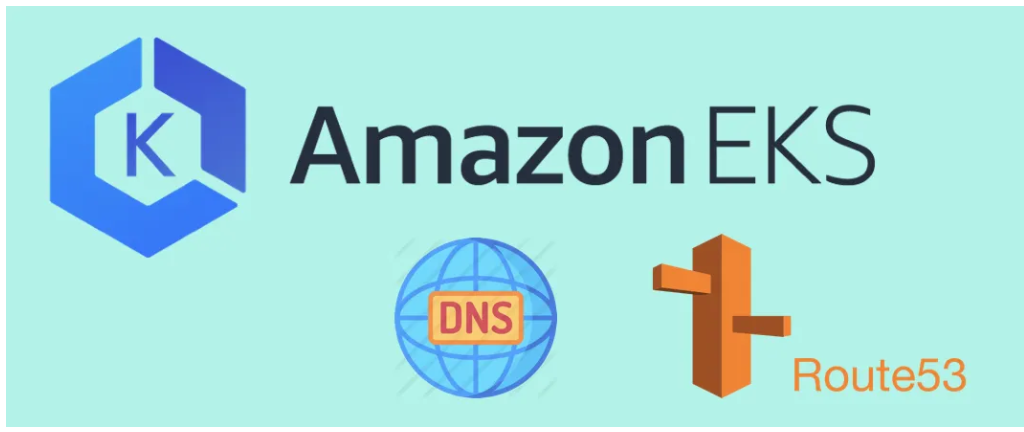
Setup External DNS to the Kubernetes Cluster
One of the features that Kubernetes provides is "service discovery and load balancing". Kubernetes can expose a container using the DNS name or using their IP address. If traffic to a container is high, Kubernetes can load-balance and distribute the network traffic so that the deployment is stable.
Prerequisites :
Before setting up an Amazon EKS cluster using eksctl, there are several prerequisites that must be met:
A domain must be hosted in Route 53.
An EC2 instance of type t2.medium running Ubuntu must be available.
AWS CLI must be installed and configured.
kubectl must be installed.
eksctl must be installed and set up.
eksctl create cluster --name eks-v2 --version 1.24 --region us-east-1 --nodegroup-name worker-nodes --node-type t2.medium --nodes 2
Set up IAM permissions
- Set up IAM permissions to give the ExternalDNS pod permissions to create, update, and delete Route 53 records in your AWS account.
IAM policy:
{
  "Version": "2012-10-17",
  "Statement": [
    {
      "Effect": "Allow",
      "Action": [
        "route53:ChangeResourceRecordSets"
      ],
      "Resource": [
        "arn:aws:route53:::hostedzone/*"
      ]
    },
    {
      "Effect": "Allow",
      "Action": [
        "route53:ListHostedZones",
        "route53:ListResourceRecordSets"
      ],
      "Resource": [
        "*"
      ]
    }
  ]
}
2. Set the below values to your default AWS region, your account id and your EKS cluster name
AWS_ACCOUNT_ID=YOUR_ACCOUNT_ID_HERE
AWS_REGION=YOUR_AWS_REGION_HERE
EKS_CLUSTER_NAME=YOUR_EKS_CLUSTER_NAME_HERE
Create IAM OIDC provider
eksctl utils associate-iam-oidc-provider \
    --region ${AWS_REGION} \
    --cluster ${EKS_CLUSTER_NAME} \
    --approve
Create Service Account
Use the preceding policy to create an IAM role for the service account:
eksctl create iamserviceaccount --name SERVICE_ACCOUNT_NAME --namespace NAMESPACE --cluster EKS_CLUSTER_NAME --attach-policy-arn IAM_POLICY_ARN --approve
eksctl create iamserviceaccount --name external-dns --cluster eks-v2 --attach-policy-arn arn:aws:iam::643392167231:policy/iam-external-dns-route53 --approve
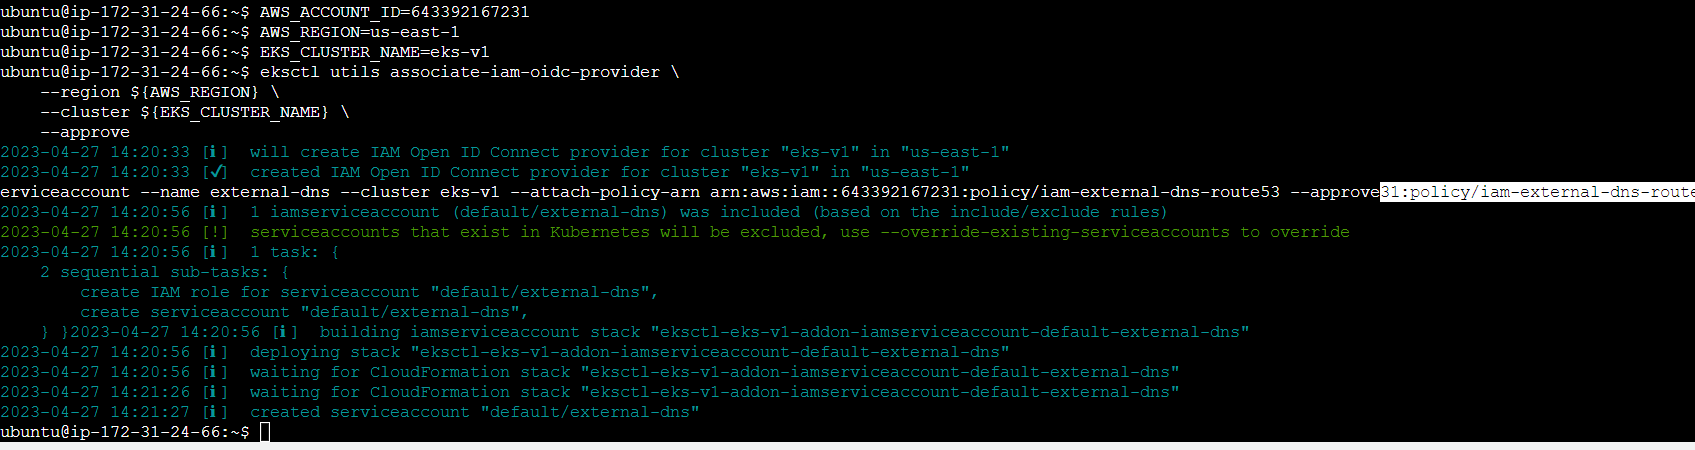
To check the name of your service account, run the following command:

Deploy ExternalDNS
Use the following manifest to deploy ExternalDNS.
apiVersion: rbac.authorization.k8s.io/v1
kind: ClusterRole
metadata:
  name: external-dns
rules:
- apiGroups: [""]
  resources: ["services","endpoints","pods"]
  verbs: ["get","watch","list"]
- apiGroups: ["extensions","networking.k8s.io"]
  resources: ["ingresses"]
  verbs: ["get","watch","list"]
- apiGroups: [""]
  resources: ["nodes"]
  verbs: ["list","watch"]
---
apiVersion: rbac.authorization.k8s.io/v1
kind: ClusterRoleBinding
metadata:
  name: external-dns-viewer
roleRef:
  apiGroup: rbac.authorization.k8s.io
  kind: ClusterRole
  name: external-dns
subjects:
- kind: ServiceAccount
  name: external-dns
  namespace: default
---
apiVersion: apps/v1
kind: Deployment
metadata:
  name: external-dns
spec:
  strategy:
    type: Recreate
  selector:
    matchLabels:
      app: external-dns
  template:
    metadata:
      labels:
        app: external-dns
    spec:
      serviceAccountName: external-dns
      containers:
      - name: external-dns
        image: k8s.gcr.io/external-dns/external-dns:v0.10.2
        args:
        - --source=service
        - --source=ingress
        - --domain-filter=external-dns-test.leononcrap.com # will make ExternalDNS see only the hosted zones matching provided domain, omit to process all available hosted zones
        - --provider=aws
        - --policy=upsert-only # would prevent ExternalDNS from deleting any records, omit to enable full synchronization
        - --aws-zone-type=public # only look at public hosted zones (valid values are public, private or no value for both)
        - --registry=txt
        - --txt-owner-id=my-hostedzone-identifier
      securityContext:
        fsGroup: 65534 # For ExternalDNS to be able to read Kubernetes and AWS token files
Verify that the deployment was successful:
kubectl apply -f deploy.yaml
kubectl get deployments
Example output:

kubectl get pods
kubectl logs external-dns-cfdb7b648-8hq84

Deploy sample Application
Once the external DNS has been set up, the next step is to deploy a sample application with a load balancer service. This will automatically update the DNS entry in the cloud DNS using the external DNS.
Create LoadBalancer service
To do this, create a LoadBalancer service that can be accessed externally through the domain name hosted on Route 53:
kubectl apply -f service.yaml
kubectl get pods
apiVersion: v1
kind: Service
metadata:
  name: nginx
  annotations:
    external-dns.alpha.kubernetes.io/hostname: DOMAIN_NAME
spec:
  ports:
    - port: 80
      targetPort: 80
      protocol: TCP
  type: LoadBalancer
  selector:
    app: nginx

---
apiVersion: apps/v1
kind: Deployment
metadata:
  name: nginx
spec:
  selector:
    matchLabels:
      app: nginx
  template:
    metadata:
      labels:
        app: nginx
    spec:
      containers:
        - image: nginx
          name: nginx
          ports:
            - containerPort: 80
              name: http
Verify that the deployment was successful:
kubectl apply -f service.yaml
Example output:

Check that the NGINX service was created with the LoadBalancer type:

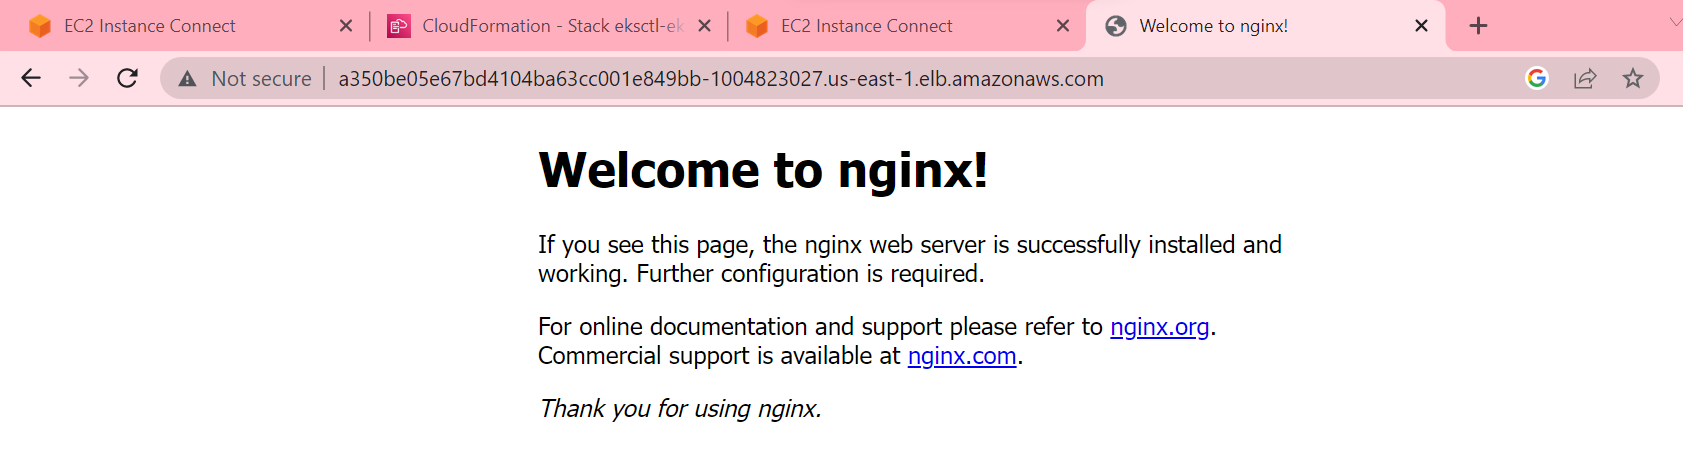
Created Route 53 records for the above LoadBalancer as mentioned below.

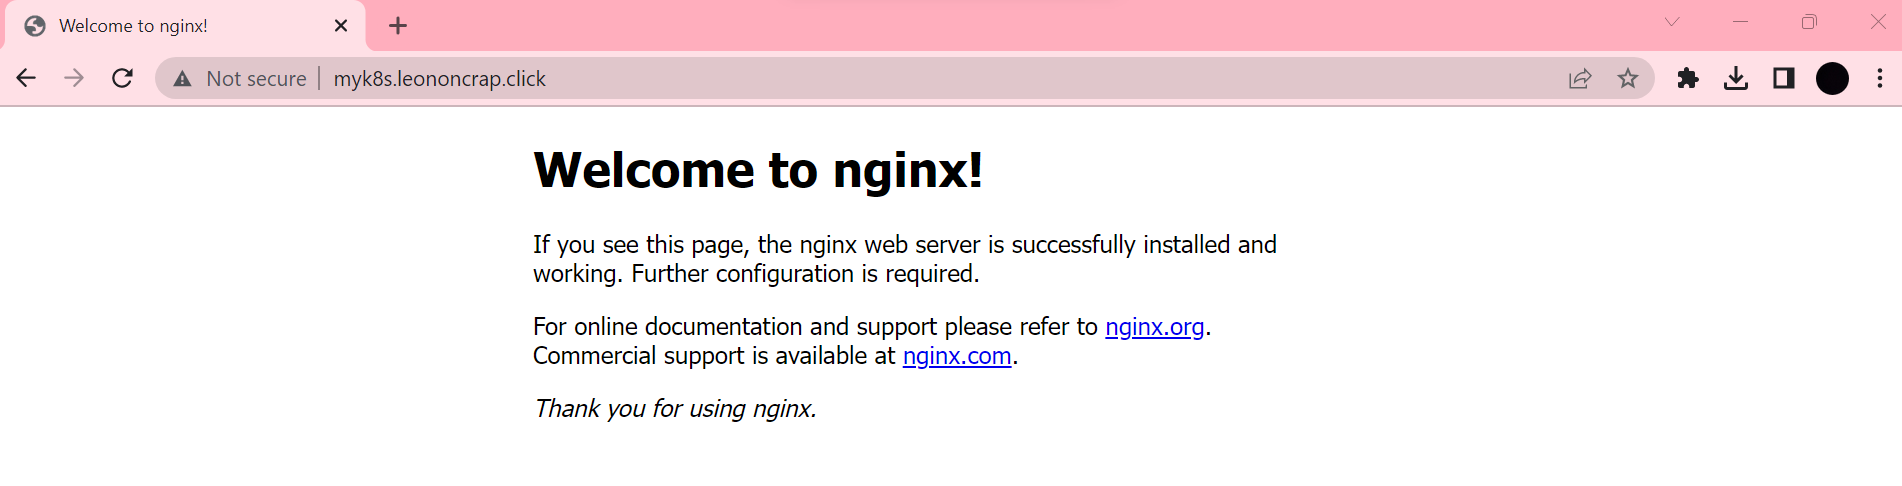
Final Output on External User Browser
Checked with by Domain(leononcram.click) as myk8s.leononcram.click.
Hurray !!! I can access my application which I deployed through pods and service.
Conclusion
Kubernetes Services and Service Discovery are powerful tools that can help DevOps teams manage containerized applications at scale. Whether you're exposing your application to the outside world or building complex distributed systems, Kubernetes Services and Service Discovery provide the necessary building blocks to manage your applications effectively in a cloud-native environment.
#Kubernetes #Devops #Trainwithshubham #Kubeweek #kubeweekchallenge #Day4challenge