Kubernetes Architecture and Components, Kubernetes Installation and Configuration

Kubernetes Overview
Kubernetes has emerged as a leading container orchestration platform, which is widely adopted by organizations for deploying and managing containerized applications. It has become an integral part of the DevOps ecosystem. Initially developed by Google and released as open-source in 2014, Kubernetes benefits from Google's 15-year experience of running containerized workloads and contributions from the open-source community. It draws inspiration from Google's internal cluster management system, Borg.
Kubernetes offers the following advantages:
Enhanced scalability and fault tolerance
Improved resource utilization
Simplified management of intricate, multi-container applications
Platform portability across various cloud providers
Explain the architecture of Kubernetes
A Kubernetes cluster consists of the control plane and a set of worker machines, called nodes.
The control plane is responsible for managing Kubernetes infrastructure. The control plane component includes:
The API Server acts as the primary gateway to the Kubernetes cluster and provides a set of APIs that users and other components can access.
etcd is a dependable, distributed, and fast key-value store that Kubernetes employs to store all cluster data.
The Scheduler is responsible for determining where to place new pods within the cluster.
The Controllers are accountable for ensuring that the current state of the cluster aligns with the desired state.
The following components operate on the worker nodes:
Kubelet, which runs on each worker node, is responsible for launching containers.
Kube-proxy is in charge of Kubernetes internal networking and service discovery.
The Container runtime is responsible for executing the containers.
Installing Kubeadm: How to Set Up a Kubernetes Cluster
Kubernetes is an open-source container orchestration system that automates the deployment, scaling, and management of containerized applications. Kubeadm is a tool that makes it easy to set up a Kubernetes cluster.
Before proceeding, several prerequisites must be met:
Two machines running Ubuntu 22.04 LTS, one for the master node and the other for the worker node.
The master node requires more vCPU and memory, so an instance type of T2.medium is recommended.
The worker node does not require as much vCPU and memory, so an instance type of T2.micro is sufficient.
Sudo privileges are required on both machines.

I have created two EC2 instances of Ubuntu 22.04 LTS, one is named K8s-Worker-Node and another is K8s-Master-Node as per the prerequisite.
We will be dividing this installation and setup into 5 steps which are as follows:
Step 1: Install the docker engine. (Both Server)
Run the following commands to update the system and install Docker:
sudo apt update -y

sudo apt install docker.io -y

sudo systemctl start docker

sudo systemctl enable docker
Step 2: Add Apt repository and Install Kubernetes components
 sudo curl -fsSLo /usr/share/keyrings/kubernetes-archive-keyring.gpg https://packages.cloud.google.com/apt/doc/apt-key.gpg

echo "deb [signed-by=/usr/share/keyrings/kubernetes-archive-keyring.gpg] https://apt.kubernetes.io/ kubernetes-xenial main" | sudo tee /etc/apt/sources.list.d/kubernetes.list

sudo apt update -y

sudo apt install kubeadm=1.20.0-00 kubectl=1.20.0-00 kubelet=1.20.0-00 -y
Step 3: Configure the Master Node.
The next step is to configure the master node. Run the following commands on the master node:
sudo su
kubeadm init
mkdir -p $HOME/.kube
sudo cp -i /etc/kubernetes/admin.conf $HOME/.kube/config
sudo chown $(id -u):$(id -g) $HOME/.kube/config

kubectl apply -f https://github.com/weaveworks/weave/releases/download/v2.8.1/weave-daemonset-k8s.yaml

kubeadm token create --print-join-command
The kubeadm init command initializes the master node. The mkdir command creates a directory for the Kubernetes configuration file. The cp and chown commands copy the configuration file and set the correct permissions. The kubectl apply command installs Weave Net, which is a popular networking plugin for Kubernetes. The kubeadm token create command creates a token for joining worker nodes to the cluster.
Step 4: Configure the Worker Node The final step is to configure the worker node. Run the following commands on the worker node:
sudo su
kubeadm reset pre-flight checks
# Paste the Join command on worker node with `--v=5`
The kubeadm reset pre-flight checks command checks if the system meets the requirements for joining the Kubernetes cluster. Then, paste the kubeadm token create command output from the master node on the worker node with the --v=5 flag. This joins the worker node to the Kubernetes cluster.
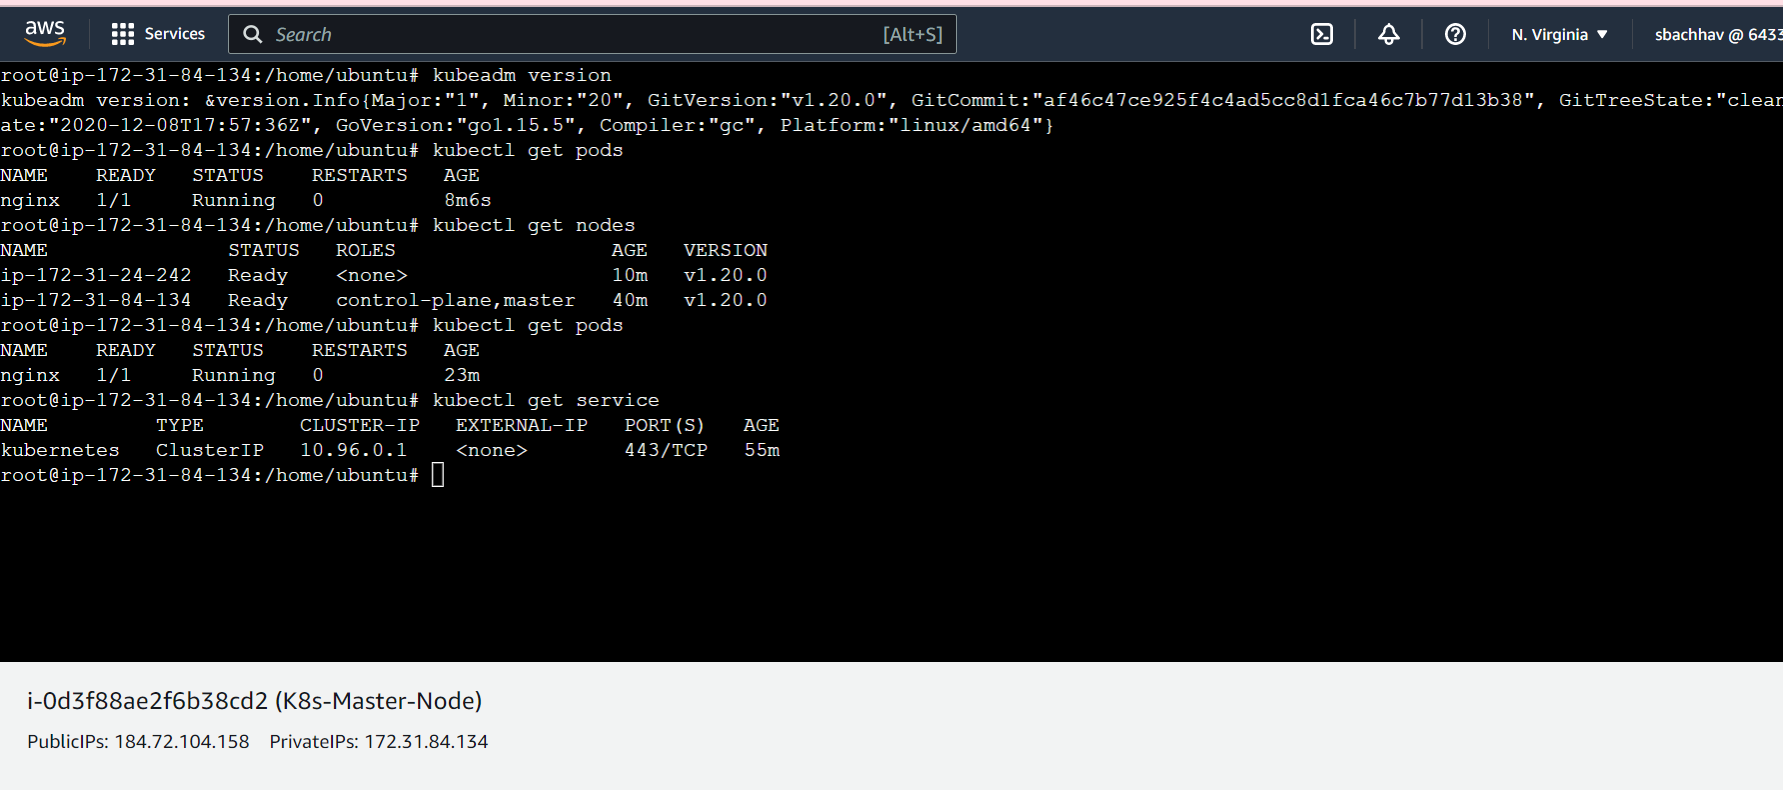
Step 5: Verify the Cluster Finally, run the following command on the master node to verify that the cluster is up and running
kubectl get nodes
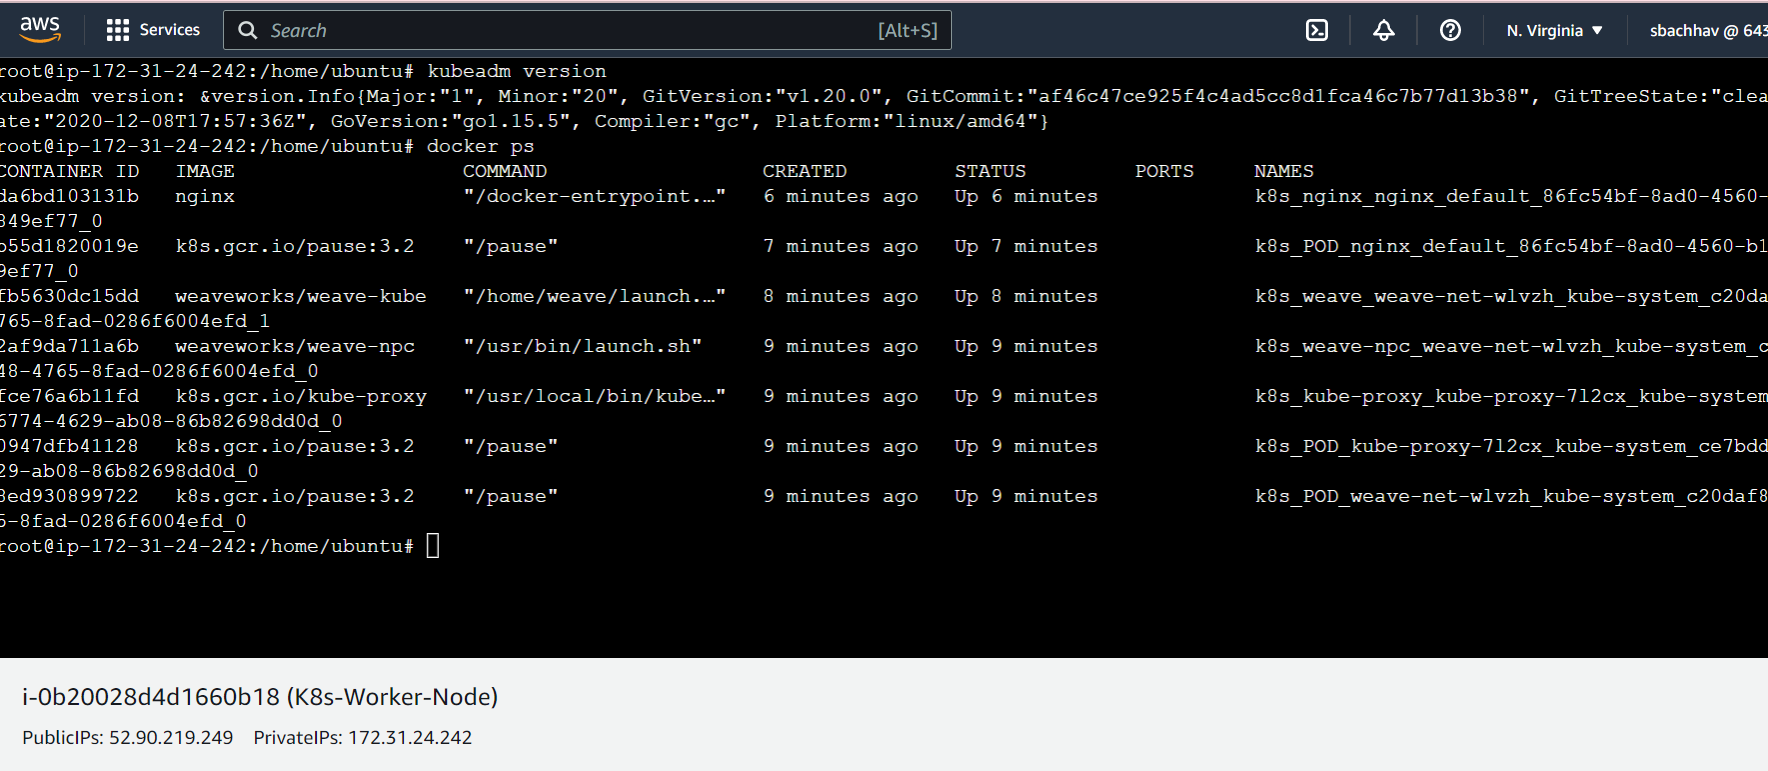
The command provided displays a list of all nodes in the cluster, and if the setup is correct, it should include both the master and worker nodes. To create a new deployment or pod, the kubectl run command can be used, such as "kubectl run mypod --image= --restart=Never". By running the "kubectl run nginx --image=nginx --restart=Never" command through the Master node, a pod running the Nginx image was created, and the results can be viewed on the worker node. A screenshot of the Master node running the command is attached.
Screensnap of Worker Node where Nginx container is orchestrated from master:
Conclusion
Kubernetes is an open-source container orchestration platform that automates the deployment, scaling, and management of containerized applications. It has a master-slave architecture, and several components work together to manage containerized workloads, such as Pods, ReplicaSets, Deployments, Services, ConfigMaps, and Secrets.
Thank you.
#cloud #devops #kubernetes #kubeweek #trainwithshubham #devopscommunity